It’s absolutely common for a Redmine user to ask: How do I add custom HTML code to the Wiki content? Here by Wiki content users usually mean not just a Wiki page, as in Redmine a Wiki syntax enabled content is used everywhere (well, almost) – in project description, in issue description, in news, in comments, and so on. Anyway, normally, for Redmine such inquisitive persons get quick and definite answer: There is no way!..
As this is a common question, certainly, I used to ask it too. But, as I’m a Redmine plugin developer, I was able to “give” a different answer… Depending on the features, I developed, I used to implement some capabilities for embeding custom HTML code into different places of Redmine interface. There were no plan or design – I just implemented, what I thought at that moment can be reasonable and needful. Only after implementing those things I realized, that in several my plugins I implemented almost the same feature – the possibility to embed custom HTML code into the Wiki content. Luckily it was implemented in different ways…
To be more precise this was done in two my plugins – in Hooks Manager and in WikiNG. As some of these features are not foremost and, therefore, can be unnoticed and as the feature is commonly asked, I decided to describe its implementations in this article.
1. Using the WikiNG hook and a template
When developing the WikiNG plugin I wanted to provide some possibility to add the content to Wiki pages using the server-side code. Normally, this can be done by implementing a custom Wiki macro for Redmine. But to do this one needs to literally write a small plugin. This one can also extend some existing plugin instead, but still he/she needs to be familiar with Redmine custom macros implementation. Instead I wanted to allow a Ruby beginner (Ruby, not Redmine) to be able to do this without the need to learn anything. The actual implementation, however, does not require the user to be familiar even with Ruby.
This is the only way, that requires users to write the code for the server side! This code, however, can be just HTML.
Redmine supports special callback functions, which it names “hooks“. These callbacks are usually executed from within view files (most code of which is HTML) and return the HTML code, which then gets embeded into the view. So, Redmine hooks, in fact, are just “placeholders” for function calls and do not return anything on their own. To return anything into the hook a developer must “attach” an actual function call to it. Also a hook can have many function calls attached to it.
To read more about Redmine hooks check this official Redmine guide.
But, the WikiNG plugin comes with the unusual {{wiking_hook}} Wiki macro. The peculiarity of this macro is that it creates a dynamic hook. The first argument of the macro – a string – is used as the suffix for the hook name. Thus, if you write {{wiking_hook(name)}} into the Wiki content, WikiNG will execute the wiking_hook_name hook and will embed the returned code in place of the macro into the Wiki content.
Let’s see, how it works on a real example. For the example let’s create the Wiki macro, that outputs 3 recent news (similar to what we have on the Redmine welcome page and on the project overview page, e.g., check this one). Let’s name it recent_news (i.e., the hook name is going to be wiking_hook_recent_news).
The text containing the macro can look as follows:
h3. Recent news

{{wiking_hook(recent_news)}}
For this code to work we first need to implement a handler for the wiking_hook_recent_news hook. Let’s do this in a special separate small plugin. So, let’s create such plugin now.
The Redmine plugin is required to have only one file (all other files are optional). This file is init.rb:
1 2 3 4 5 6 7 8 9 10 11 12 | require 'redmine' Rails.logger.info 'Starting WikiNG Recent News Hook plugin for Redmine' Redmine::Plugin.register :wiking_recent_news_hook do name 'WikiNG Recent News Hook' author 'Andriy Lesyuk' author_url 'http://www.andriylesyuk.com' description 'Sample plugin, that implements recent_news hook/macro using WikiNG.' url 'http://blog.andriylesyuk.com/three-ways-to-add-custom-html-content-to-wiki-in-redmine' version '0.0.1' end |
Here, :wiking_recent_news_hook is the name of the plugin. The rest code, I guess, does not need any explanation?
The plugin directory should be named after the plugin (i.e., its name should be wiking_recent_news_hook) and should be put into the plugins directory of Redmine. So, the full relative path to init.rb should be plugins/wiking_recent_news_hook/init.rb.
Handlers for Redmine hooks are to be defined in a special Ruby class, that derives from Redmine::Hook::ViewListener. So, let’s create such class in the lib subdirectory of our plugin:
1 2 3 | class WikiNGRecentNewsHook < Redmine::Hook::ViewListener end |
The file name should reflect the class name. So, if we choose WikiNGRecentNewsHook as the class name, the file name should be wiking_recent_news_hook.rb (in the lib directory).
Now let’s add the handler (the 3rd line):
1 2 3 4 5 | class WikiNGRecentNewsHook < Redmine::Hook::ViewListener render_on :wiking_hook_recent_news, :partial => 'hooks/recent_news' end |
This is the recommended way to define the handler. This way you, actually, associate the view file with the Redmine hook. In this case the view file should also be created. The name of this file must be _recent_news.html.erb and it must be located in the app/views/hooks subdirectory of the plugin (that’s where hooks/recent_news comes from):
1 2 3 4 5 6 7 8 9 10 11 12 13 14 | <% if @project %> <% latest_news = @project.news.includes(:author, :project).order("#{News.table_name}.created_on DESC").limit(3).all %> <% else %> <% latest_news = News.latest(User.current, 3) %> <% end %> <ul> <% latest_news.each do |news| %> <li> <%= link_to_project(news.project) + ':' unless @project %> <%= link_to(h(news.title), news_path(news)) %> by <%= link_to_user(news.author) %> </li> <% end %> </ul> |
As you can see the main code of the view file is just HTML. I use the eRuby code, only because I need to access recent news.
Now, when our view file is ready and is associated with the hook through the WikiNGRecentNewsHook class, we need to load it into our plugin by adding the 3rd line (require_dependency) into the init.rb file:
1 2 3 4 5 6 | require 'redmine' require_dependency 'wiking_recent_news_hook' Rails.logger.info 'Starting WikiNG Recent News Hook plugin for Redmine' ... |
That’s it! Now we can restart Redmine and try it:

The WikiNG custom macro is good, when you need to do some calculations on the server side (like fetching recent news). For all other cases, I believe, it’s too complicated to use. Another disadvantage is that it requires the access to the server and such access as well as the bad code can potentially lead to crashes…
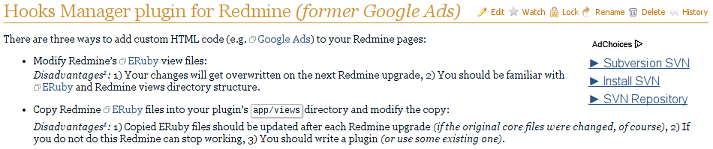
2. Using the Hooks Manager hook
The previous section reveals, how complicated is it to use Redmine hooks, and clearly demonstrates, why they can’t be used by ordinary Redmine users. However, you can forget about all these complications, when you use the Hooks Manager plugin. As this plugin makes it possible to create handlers for Redmine hooks from within the Redmine web interface. All you need is to specify the HTML code, which should be returned, when the hook is executed by Redmine. Certainly, only Redmine administrators can manage hooks this way and, certainly, no server-side code is possible in such case…
While developing Hooks Manager I thought, that for this plugin, which supports the majority of the core Redmine hooks, it would be great to have an own hook, that could be used inline in the Wiki (yeah, like the {{wiking_hook}}) and that would be supported out-of-the-box (WikiNG hooks needs to be registered, see here how). The idea of such hook was then extended and ended up with an interesting solution, that supports… JavaScript.
This very special hook can be triggered by putting the {{inline_hook}} macro into the Wiki content. This hook supports any number of named arguments (which can be specified as name=value). All such arguments are automatically made available as JavaScript variables, so you can use these arguments through JavaScript in the HTML code, you specify for the hook.
Let’s see how this can be used on another real example. For the example let’s implement support for Google AdSense using the inline hook of Hooks Manager.
As you might know Google AdSense uses JavaScript code for embedding ads into the page. This code uses special variables, some of which we intend to override using arguments to the {{inline_hook}}. Thus, our code for an embedded Google ad can look like:
{{inline_hook(google_ad_slot=6129352291,google_ad_width=160,google_ad_height=90)}}
Now let’s go to Administration → Hooks… As {{inline_hook}} is a special (extra) hook, you need to enable the “Show all hooks” checkbox first. Then unfold “Wiki page” and click on “Content (inline)”.
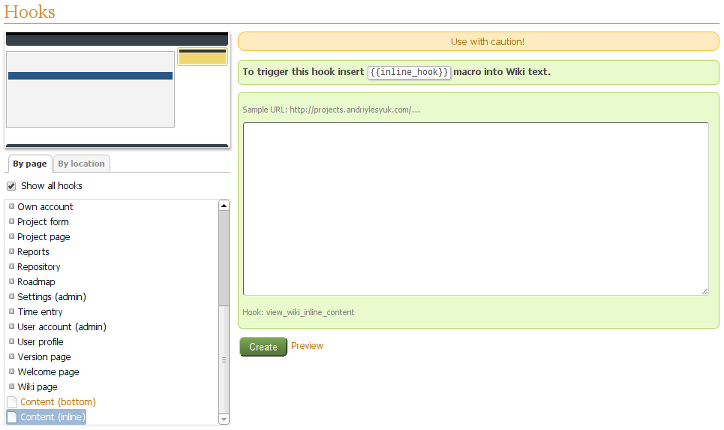
That’s the form, which lets us specify the HTML content for the view_wiki_inline_content hook, which is triggered by the {{inline_hook}} macro.
In this form add the following code:
<div style="background-color: white; padding: 0.5em 0 0.5em 1em; float: right;"> <script type="text/javascript"> google_ad_client = "ca-pub-5254575610283130"; </script> <script type="text/javascript" src="http://pagead2.googlesyndication.com/pagead/show_ads.js"></script> </div> |
And click “Create”.
Now, when going to a Wiki page, that contains the call to the {{inline_wiki}} macro (assuming, that you have specified the proper value for google_ad_client and the macro call has proper arguments), you should see something like this:
The real-life example of the screenshotted page can be seen here.
Usage of JavaScript variables makes the {{inline_hook}} macro very powerful, but, at the same time, it also makes it potentially dangerous… While at the moment I do not know any ways to make a damage using this macro, I assume, that overriding JavaScript variables from the Wiki content can potentially cause security (or other kinds of) issues. This becomes especially serious as the capability of writing Wiki content is usually granted to many users of different roles. Luckily, the {{inline_hook}} macro and its JavaScript variables can be easily disabled just by not defining any content for this macro. You have been warned, if you still like to use it…
Nevertheless, the easy way to define HTML content for other Redmine hooks, all of which are executed outside the Wiki content, makes this plugin very useful. Moreover, as you might have guessed it’s possible to add your custom WikiNG-hook-based macros (described in the previous section) to Hooks Manager and gain the easy way to define HTML content for them! Read this Wiki page for details on how to do this…
3. Using a WikiNG custom macro
Redmine hooks are really great feature, what two of three sections of this article do proove. But have you noticed, that this is the custom Wiki macro, what makes it possible to execute the described hooks within the Wiki content?.. There is no doubt, that custom macros are not less great feature!
But the problem of custom Wiki macros is that they require users to know Ruby and to write a plugin (or extend an existing one) to add a macro… This restriction did not let custom Wiki macros to get spread much. And this is the issue, I thought much about while working and designing my WikiNG plugin. Eventually, I found a way to let Redmine administrators add custom macros from within the Redmine interface (similar to how the Hooks Manager allows to define HTML content for hooks).
So, let’s discuss a real example of how a custom Wiki macro can be created using the WikiNG plugin. For the example let’s add the macro, that creates a link to online documentation about a PHP function.
Assuming, that to add the link to the PHP function call_user_func_array (the link will point to http://php.net/manual/function.call-user-func-array.php), we want to use the syntax:
{{php_func(call_user_func_array)}}
Now let’s create the corresponding custom macro. For this we go to the new Custom Wiki macros menu item in Administration and click the “New macro” link:
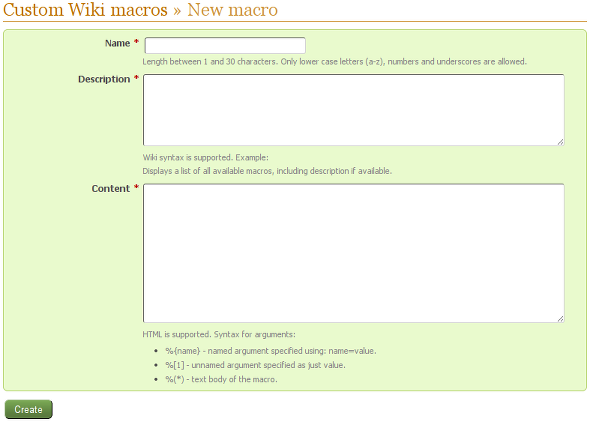
As the name for our macro we’ve chosen php_func, we put this name into the “Name” field.
Each Redmine custom Wiki macro can contain description, which gets shown, when the macro list is displayed (we’ll discuss how to do this a little bit later). This description is very important, as it tells the user, how to use the macro. The description supports the Textile (Wiki) syntax. So, let’s put the following text to the “Description” field:
Generates a link to a PHP function. Example: @{{php_func(function_name)}}@
And, finally, the main field of the custom macro is “Content”, which should hold the HTML code, that will replace the macro on rendering. For our php_func macro this content can be:
<a id="php_func_%[1]" href="#" class="icon" style="background-image: url(http://example.com/files/php.png); background-position: 2px 50%;">%[1]()</a> <script type="text/javascript"> $("#php_func_%[1]").attr('href',"http://php.net/manual/function.%[1].php".replace(/_/g, '-')); </script> |
Here, %[1] is going to be replaced with the first argument, passed to the macro (call_user_func_array in our case).
In this sample content I use JavaScript to fix the href attribute of the link. This is needed because PHP.Net expects underscores in the URL to be replaced with dashes. Also you will need to find another image for the icon, as I’m not sure, if this one is free (the link in the sample code is not valid).
So, when rendered the Wiki page containing our macro call can look like:
![]()
In addition to numeric arguments WikiNG custom macros support named arguments (i.e., name=value), that can be accessed as %{name}, and the text argument, which can be accessed as %(*). See this page for details.
Certainly, when creating your custom macros, you should always remember, that different users (of appropriate roles) will be able to use them! So, you should be especially careful and always remember about the security. Check also this page for some recommendations.
You may also want to show the full list of macros, supported by your Redmine installation (which will also include macros provided by other plugins), to the user somewhere on your Redmine help pages (if such pages exist). For this just put the {{macro_list}} macro into the corresponding Wiki page (or whatever), which will be replaced with information about supported macros on rendering. For example, check how it shows our custom macro (it uses the “Description” field):

Despite the security concerns (to resolve which you just should be careful) the WikiNG custom macros are, perhaps, the best and easiest option for embedding the custom HTML code into the Wiki content. Usage of the standard Redmine custom macro concept makes them transferable to other Redmine installations (thus, I created a kind of “registry” of WikiNG custom macros here).
Comments
Also available in: Atom
Add a comment